Clearing a locked email account

Contents
If someone repeatedly attempts to log into VPOP3 with incorrect login details, VPOP3 will lock their user account, or IP address, or both. This is to help to prevent attacks on accounts or on the VPOP3 server.
If someone tries to log into an existing account with invalid details, then VPOP3 will lock the account, usually after 3 consecutive failed login attempts to that account from an IP address.
If someone tries to log into multiple accounts, or non-existent accounts or continues trying to log into an existing account, VPOP3 will lock the IP address, usually after 10 failed login attempts within a short period.
Account lock
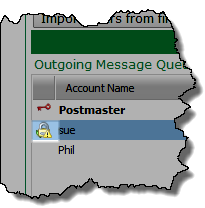
If an account is locked, a padlock is displayed next to the account name in the Users list:
To see the lock details, double-click on the user account name and go to the General tab.

If the account is locked, then the Account Locked Out box will be checked, and the box underneath will show the IP address(es) to which the lock applies. IP addresses not listed there, will still be able to access the account.
To unlock the account, simply uncheck the Account Locked Out box, and press the Submit button.
NOTE: |
The account will automatically unlock after 30 minutes (as long as there are no further attempts to log in with incorrect details). Restarting the VPOP3 service will also remove any account locks. |
The account lockout policy is set on the Settings -> Security Settings -> General tab.

oLock user after x invalid login attempts - This sets how many consecutive failed login attempts are needed from a particular IP address before the account is locked.
oLock user for x minutes - This sets how long the lock should be applied for. After this time, the lock is automatically removed.
oApply account lockout policy to WebMail/Admin even when connecting from 127.0.0.1 - By default VPOP3 will not lock accounts if they are accessed by Webmail from the 127.0.0.1 loopback address. This address can only be used on the VPOP3 computer itself. As access to this computer is usually restricted, allowing unlimited login attempts from the VPOP3 computer itself is an acceptable risk to avoid administrators being locked out from the server themselves.
IP address block
If VPOP3 detects repeated failed login attempts from an IP address, it will block that IP address. IP addresses can also be blocked because of suspicious SMTP behaviour, which is described in the SMTP suspicious behaviour section.
IP address blocking because of failed logins in set on the Settings -> Security Settings -> Intrusion Protection tab.

oMonitor logins period - This tells VPOP3 over what period it should monitor login attempts. So, in the above screenshot, VPOP3 will look for at least 10 failed logins from a single IP address over a 30 minute period.
oFailed login threshold - This tells VPOP3 how many failed login attempts it should look for. This can be incorrect passwords or non-existent account names.
oFailed login block time - This sets how long an IP address should be blocked for if the failed login threshold is reached within the monitor logins period.
oManage Block List - This lets you view and edit the list of blocked IP addresses.
oManage Never block List - This lets you view and edit the list of IP addresses which should never be blocked (eg internal or trusted IP addresses)
oView Event Log - This lets you see recent failed login events.
NOTE: |
If an IP address is blocked, then the email client will receive an error like Your connection has been blocked temporarily - try again later. |
If an IP address is blocked, you can click the Manage Block List button to see a list of IP addresses which have been blocked. You can double-click on an address to see why the address was blocked, and select the address and press the Delete button to unblock the IP address. You can also manually add IP addresses to the block list if you have detected an attacker by some other means.
If you have a trusted IP address that you want to never be blocked, you can click the Manage Never Block List button and add or remove trusted IP addresses from that list.
NOTE: |
When adding entries to the Block List or Never Block List you can enter individual IP addresses, or IPv4 or IPv6 network ranges in CIDR format, (eg 192.168.1.0/24 is equivalent to 192.168.1.0 with a subnet mask of 255.255.255.0). Your network administrator should be able to tell you your internal network ranges in CIDR format. |